11. April 2024 By Kristóf Nyári
Jenkins on k8s Part 2: The application
In the previous installation of this series, we discussed a wide variety of topics ranging from introducing Jenkins as one of the leading CI/CD tools, through the creation of a Kubernetes Cluster within the Google Cloud Platform all the way combining the two, and having a running copy of Jenkins inside our GKE Cluster. With this in our hand, we shall begin the journey of automation, and reducing our workload of manually doing repetitive stuff. There is one question however, that remains: Deploy what?
1. Designing the application
Application design encompasses the intricate web of decisions and strategies that shape an application's behaviour and capabilities. It's the blueprint that guides us developers in structuring the application's underlying components, orchestrating their interactions, and ensuring they work harmoniously to deliver value to users; thus, it is necessary to not forgo this step.
1.1 Functional design
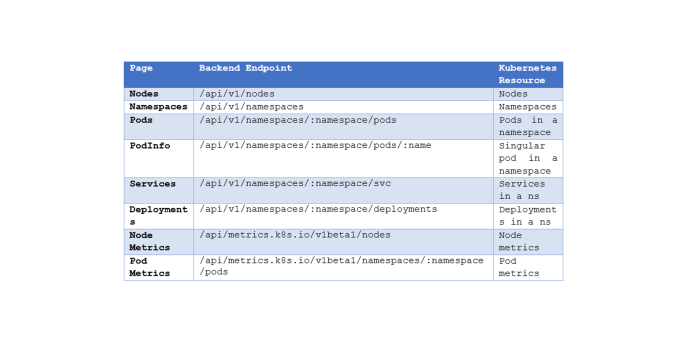
Essentially, functional design should dictate how the underlying business logic works and how data flows throughout the application. When conceptualizing our demo application, the main task was translating the native Kubernetes API endpoints into certain pages in the web application layer. This meant, that for each Kubernetes resource – in our case not every resource –, there would be a correlating page displaying the details of said resource.
To achieve this, two things are required: a backend, that retrieves the Kubernetes resources and passes the results onward to its own API endpoints and a frontend that consumes the API and displays the data. The flow of data can be modelled as one-way, since there will be no intended functionality to pass data back to Kubernetes. Mapping the API endpoints will result in the following table (attributes beginning with ‘:’ are variable parameters):

This is not by all means a complete representation of Kubernetes resources, but it will suffice for the demo application. After clarifying the functionality of the application, the next stage of design can commence.
1.2 Infrastructural design
Infrastructural design is the cornerstone of application development, the framework around which all other functionality is constructed. The choices made at this foundational level of architecture, from scalability and reliability to security and performance, establish the stage for the success of the entire project. A guideline to secure and reliable applications is set in the Well Architected Framework from AWS, which is an essential knowledge for anyone building cloud native applications.
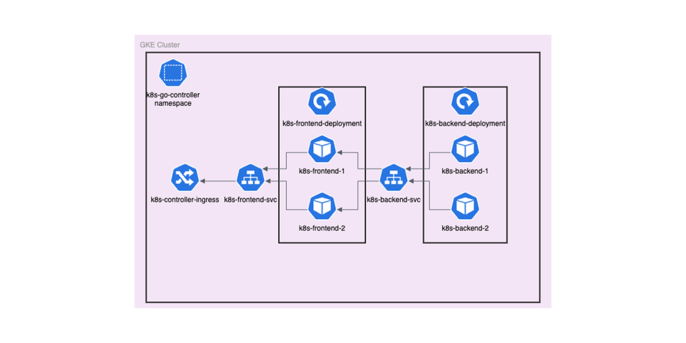
In the case of this demo application, the strict guidelines of the Well Architected Framework may not apply exactly. The following diagram present the initial architecture of the application:

The diagram presents the architecture plan of the application inside the Kubernetes namespace k8s-go-controller. There will be 2 separate Deployments for both the frontend and the backend with 2 replicas each, and a Service for each tier, thus enabling communication between Pods. Both frontend and backend pods will have resource limits, as it is necessary to set an upper bound so that there will be no incidents of pods devouring unused RAM and CPU capacity. Since these applications are nowhere near large production scale, I set a limit of 256MiB of RAM and 500m of CPU as their maximum allowed capacity.
1.3 Cluster necessities
To allow connections from outside of the cluster, an Ingress is required. However, this is not that simple. The Ingress object in Kubernetes by itself is insufficient, as there needs to also be an Ingress Controller to handle requests. One of the most popular Ingress Controllers is the nginx Ingress Controller which can be installed easily via Helm.
In order to gather metrics data within Kubernetes, the Kubernetes Metrics Server needs to be present. Without this running, the metrics endpoints of the application would simply result in HTTP 5xx error codes.
2. Transforming Vision into Reality
With the blueprint of our application's functional and infrastructural design in hand, the phase of turning concepts into code shall commence. The completed source code of the application can be found in my GitHub repos and the Docker images in DockerHub.
2.1 Backend
Using the Gin Gonic framework, the app serves RESTful APIs that create the backbone of our application, enabling seamless communication to the frontend service.
In order to communicate with Kubernetes, the app uses the Kubernetes client go package that enables the app to communicate with the Kubernetes API Server to retrieve the desired data.
The application follows a basic controller – API architecture: the business logic is handled via controllers and the resulting data in served via APIs. In order to communicate with Kubernetes the kubeconfig has to be supplied, which happens via Environment Variables.
2.2 Frontend
React is the declarative, component-based library at the core of the frontend service, enabling us to create dynamic, interactive user experiences with unmatched ease and flexibility. React achieves this by utilising a so-called virtual DOM and component lifecycle. Using React's component architecture, we decompose our user interface into reusable, composable building blocks, each encapsulating its own logic and presentation.
Navigating between pages and views in our application comes with ease thanks to React Router, which also allows for deep linking and smooth transitions, all of which improve usability and user engagement.
Handling business logic on the frontend side happens via axios, which is a lightweight Promise-based HTTP client for node.js. It enables us to communicate with the API endpoints served by the backend client. In the /helpers/kubernetes-helpers.js file, all helper functions relating to the backend endpoints are listed. These are being utilized throughout the application in order to easily and effectively query the Kubernetes resources provided by the backend client.
2.3 Containerization & Kubernetes
Utilising containerization tools like Docker and methodologies such as multi-stage builds, we package our applications, along with their dependencies and assets, into self-contained images that can be deployed and run consistently across any Kubernetes cluster or container runtime environment. By containerizing our services, we achieve consistency and reproducibility across development, staging, and production environments, eliminating the dreaded "works on my machine" phenomenon and streamlining our CI/CD workflows (this will come in handy during the next part of the series, where we will be automating the deployment of these apps).
Leveraging Kubernetes compatibility, both our frontend and backend services seamlessly integrate with Kubernetes clusters, enabling us to orchestrate complex deployments, manage workload scaling, and enforce resource allocation policies with ease. In order to successfully deploy our services into Kubernetes, a few necessary steps are to be made.
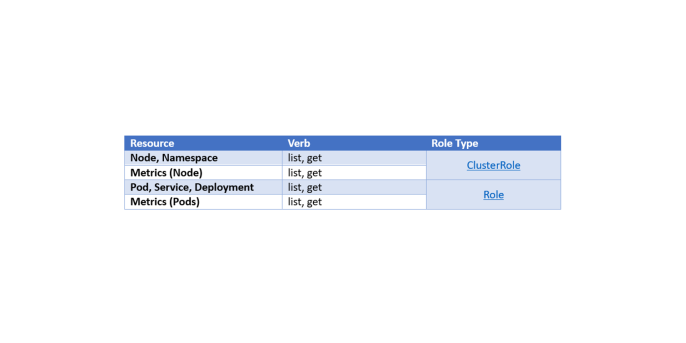
By default, freshly created Pods are associated with the default Service Account. This however does not help our case as the default Service Account barely has any rights to access resources (You can check permissions via kubectl auth can-i list deployments --as=system:serviceaccount:<namespace>:default). Thus, creating a Service Account and assigning the necessary permissions is crucial. The important verb & resource pairs are the following:

To assign a Service Account to Pods, setting the value of the field spec.serviceAccountName to the desired Service Account does the trick. (Be careful to only apply Service Accounts to Pods that are in the same namespace)
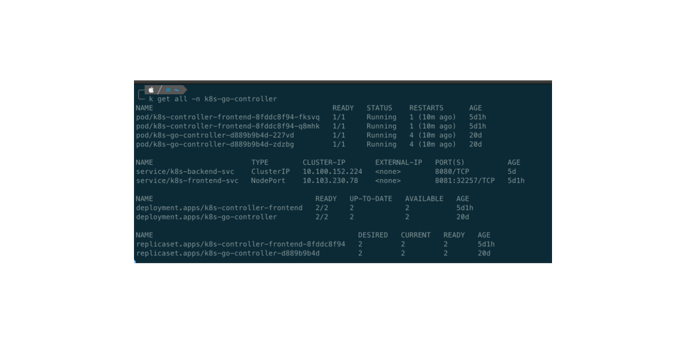
After applying the definition files (via kubectl apply -f <file>), our cluster should look something like this (IP addresses and NodePort might differ):

3. Conclusion
In this installment of our Jenkins on Kubernetes series, we’ve progressed from the bare idea of an application to the complete implementation and deployment to Kubernetes. We’ve laid the foundation of modern cloud native web application via the Well Architected Framework and utilized this guide to craft our two services. We have explored the basics of Kubernetes Role Based Access Control (RBAC) and assigned a ServiceAccount to the specific Pods enabling it to query Kubernetes objects.
So, stay tuned for the next chapter, where we will be diving deep into Continuous Integration & Continuous Deployment via our Jenkins server, defining pipelines and reusable automation functions to make deploying application stress-free.

